Test/Review – Peli 1510 Case
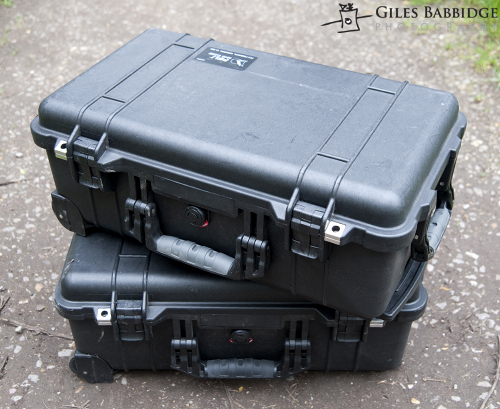
Throughout the course of the year, I’ve been extensively testing the Peli 1510 roller case, putting it through a whole range of assignments, conditions and locations.
It’s faced everything from the relative safety of being wheeled along railway concourses en route for corporate city assignments, to being thrown in the back of the car and dragged across fields for outdoor location shoots.
Rather than giving you a list of every conceivable detail of the 1510, I’ve put together a quick video. As you’ll see, real-world testing makes for a much better indication of what you can expect from a product and I hope my little explanation of the key features answers the typical questions you might have.
In addition, here are a few extended thoughts which you might find of interest, too…
Let’s start with the basics. The 1510 comes in a number of configurations. As standard, you’d receive a black one featuring Peli’s Pick ‘n’ Pluck system, which allows you to selectively remove the foam in such a way as to mould it snugly around your cameras, lenses and accessories.
In my experience, whilst this does a great job and is not exactly fiddly, it can be frustrating to make the adjustments only to find, subsequently, that you have more kit (such as a new lens) which needs fitting in somehow. Unfortunately, trying to replace the foam doesn’t really work, so you’re essentially left with permanently-shaped spaces which don’t necessarily fit additional items. This is not a criticism of Peli, but just be aware; worse case scenario, you can always purchase a whole new block of Pick ‘n’ Pluck.
To get around this conundrum, you’d be well advised to take the route that I’ve always favoured – plump for the optional padded divider system, which allows you to move, adjust, replace and tailor the case’s internal space to your heart’s content. This, essentially, makes your choice future-proof. The materials are very durable, as you’d expect from Peli, and feature good, tough Velcro tabs (which show no signs of ripping away from their stitching) attached to a good density of foam padding sections.
Should you wish to switch around the complete contents of your 1510 in a quick and easy way (for example to swap different kit set-ups), all you’d need to do is pull out the divider system as a whole and replace it with an identical second one. Time-saving and practical!
A lot of people are familiar with Peli cases, even if they don’t realise it. If you watched the last series (I think) of Top Gear, you’ll most likely have seen one driven over by a Land Rover. Yes, these cases really are that tough! The only thing I’ve ever known to destroy a Peli is a hand grenade (something of an extreme test, admittedly!).
Hard-shell cases are not for everyone or for every scenario. For example, they’re not ideal on long treks; whilst it is possible to carry them on your back, I think most people would favour a backpack with comfy straps and padding. But undoubtedly, one of their biggest selling features is their strength.
What these cases are great for, as I hope you picked up in the video, are occasions where you want the best possible protection for your kit along with the reassurance that a ‘solid box’ design provides. I’ve watched them fall from heights, get bashed into concrete walls… I’ve used them to get extra height up to a tripod, and to keep my bum dry when sitting low to the ground in wet fields. At every turn, nothing has failed (apart from the stitching coming undone on one of the mesh pockets – a minor detail and easily repairable).
What would I do to improve the 1510? I would include a more comfortable grip on the pull-up handle and perhaps allow a little more space around the wheels, just to help avoid that clogging-up I talked about. Other than that, I’d say Peli has got their design pretty spot-on.
For full specs, take a look at the 1510 page on the Peli website.
—
Edit: The web links above have been updated (August 2017) to show the current incarnation of the 1510 case.
Category: Test/Review, Video


